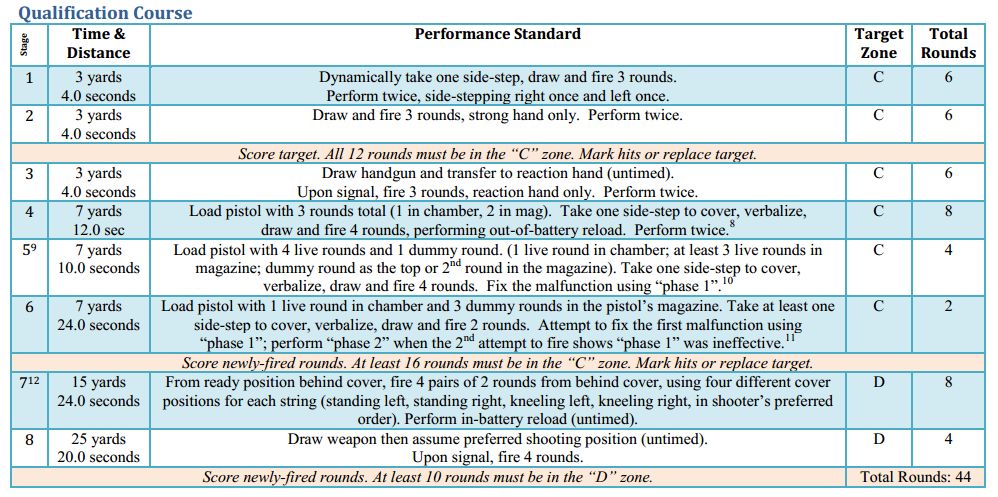
Someone recently sent me a copy of the current Wisconsin state law enforcement pistol qualification course of fire. The summary version of it is here
I shot a reduced version of the course and put the videos out on Instagram.
Analysis and Discussion
I like a lot of things about this course of fire. The full document can be downloaded here
The discussion in the course description document is very detailed. For example, the limitations of the course of fire are addressed:
This course merely evaluates an officer’s ability to perform basic psychomotor skills in a controlled setting, testing whether an officer can accurately operate a handgun in a low-stress environment. This course does not indicate whether officers have received recent, relevant, and realistic training necessary to perform their job. It does not train or test an officer’s ability to perform psychomotor skills in a rapidly-evolving, dynamic, and realistic work environment. This course does not evaluate whether an officer can recognize pre-assault indicators, select and implement appropriate tactics, or determine what level of force—if any—is appropriate. It does not evaluate one-handed reloads, drawing with the reaction hand, drawing and shooting from a seated position, low-light or flashlight-assisted shooting, multiple assailants, shooting while moving, shooting at moving targets, etc. Law enforcement agencies are strongly encouraged to provide firearms and deadly force training at least three times per year.
Training Standards
The evaluation includes more than simply getting the required hits in the allotted time. Their course of fire description includes a list of all the behaviors instructors must see performed correctly during the shooting test.
The shooter must consistently perform all of the following to qualify:
- Handgun is always handled in a safe manner.
o Trigger finger is on frame outside trigger guard at all times, except when firing.
o Weapon is always pointed in an appropriate direction and never sweeps the officer or others. - Proper draw.
o Does not sweep reaction hand, self, or others during the draw.
o Punches gun straight out towards target. - Exhibits acceptable stance and firm, high grip.
- Verbalizes appropriately/as directed.
- Uses cover effectively whenever it is available.
o Moves towards cover and/or sidesteps while drawing.
o Maintains at least one arm’s length distance from cover/does not “crowd” cover.
o Uses cover to protect self as much as possible. - Maintains peripheral view of suspect when reloading or clearing a malfunction.
- Performs autogenic breathing and a 360-degree scan for additional threats following each string. Does not reholster until completion of 360-degree scan.
- Uses one hand to reholster. Does not sweep self or others and does not look at the holster.
- Safely and appropriately follows all range directions and instructor commands.
That’s a very detailed list that includes a good mix of do’s and don’ts.
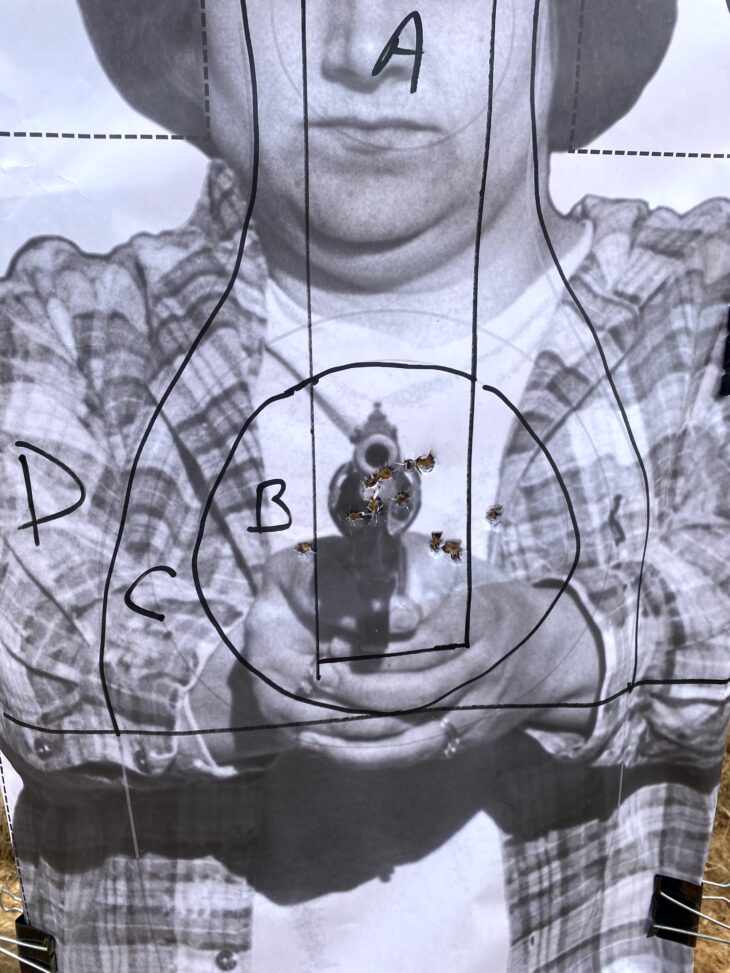
Target
The preferred target is an IALEFI 23″x35″ target that’s been modified to have specific scoring zones, A, B, C and D. The A-B-C zones are anatomically relevant. Note that the C zone stops at the bottom of the lungs, at the sternum/diaphragm level, and hits below that region are considered “D” hits. D hits are only considered acceptable for shots fired at 15 and 25 yards. (In a perfect world, they should not be considered acceptable there either. Changing that scoring requirement is the only major change needed to this course of fire.)
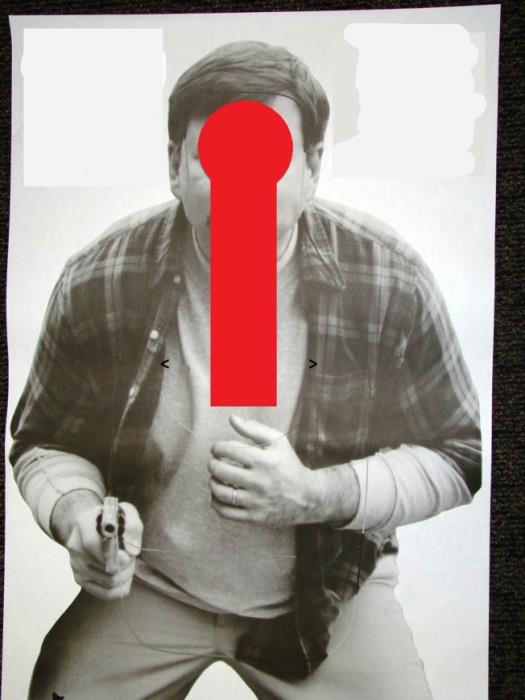
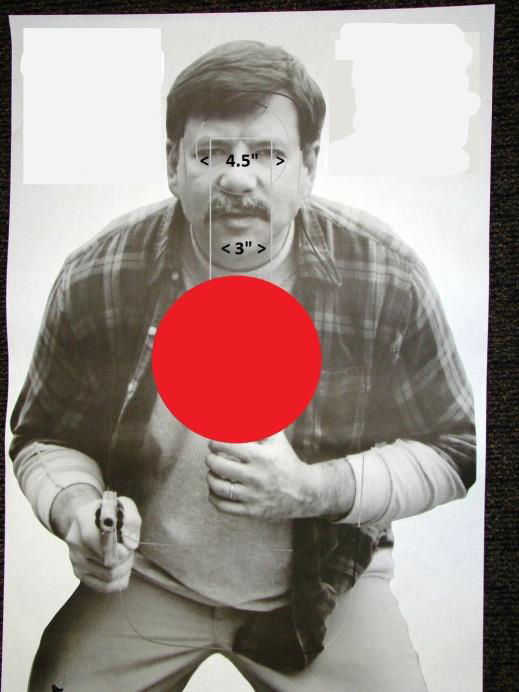
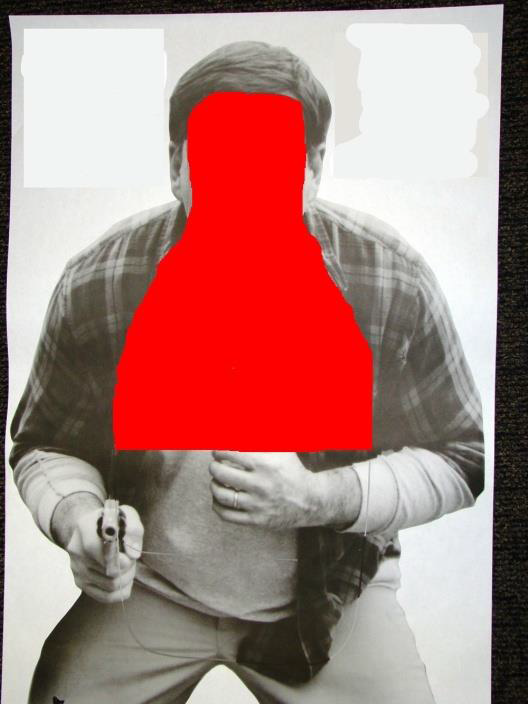
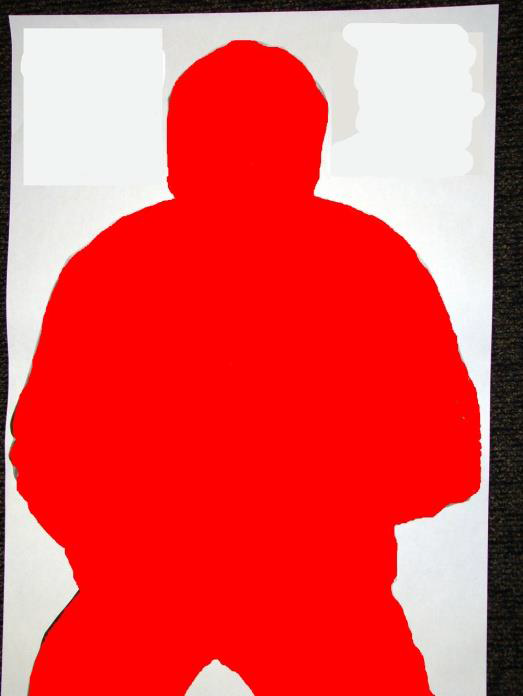
If you want to modify a standard IALEFI target, or any other target to have the correct scoring zones, the dimensions are
Any life-size photo target with target zones of 4½” diameter (head), 3”x14” (CNS), 8” diameter (chest), and short “bowling pin” (5½” head zone tapering to 12½” wide chest zone, 17” high).
STRING BY STRING ANALYSIS
3 yards
- Side step, draw and fire 3 rounds in 4 seconds using both hands. (2x)
- Standing still, draw and fire 3 rounds in 4 seconds using strong hand only (2x)
- Score target to verify that all 12 hits are in A/B/C zone. Repair target
- Draw handgun and transfer to ‘reaction’ hand (aka support hand, aka “weak hand”, aka “non dominant hand’).
- On signal, fire 3 rounds, one handed. (2x)
As the difficulty level of the shooting increases (from two handed to strong hand only to support hand only), the amount of gun handling that has to be done between the signal and first shot is decreased. Step & draw, vs draw vs present from ready. This allows the time limit to remain constant across all strings, which is convenient for those running the timer or turning targets. (I am a fan of minimizing timing changes between strings.)
Scoring the target after fewer strings makes it easier to track shooter performance and identify areas that need improvement. It’s hard to figure out which shots went where when analyzing a target with 30-50 shots on it. A shooter incapable of putting those first 12 rounds into the C zone at 3 yards within the fairly generous time limits probably needs additional coaching or instruction.
The assumption with this test is that some kind of retention duty holster is being used. Non-LEOs shooting this test should be drawing from concealment for the time limits to be relevant. Those wanting to run the test from an open carry/gamer/’I only wear this to training classes” rig should drop the par time for all the 4 second strings down to 3 seconds, and make similar reductions in other strings.
7 yards
All the 7 and 15 yard strings use a barricade, or a stack of two 55 gal barrels, or a cardboard target mounted on a target stand beside the shooter as cover that must be stepped behind and shot around. If you don’t have a way to set up cover to move to, cut the par times for each string down by 2 seconds, and challenge yourself to put all your shots in the B, rather than the C, zone, as compensation for the advantage you get by not moving and not having to lean out from cover.
- Load pistol with a total of 3 rounds (1 in chamber, 2 in mag).
- On signal, sidestep to cover, verbalize, draw and fire 4 rounds, performing an out of battery reload (aka emergency reload aka slide lock reload). 12.0 seconds. (2x).
- Load pistol with 4 live and 1 dummy round. 1 live round in chamber, at least 3 live in magazine, dummy as the top or 2nd round in the magazine.
- On signal, sidestep to cover, verbalize, draw and fire 4 rounds, fixing the malfunction using phase 1 (aka tap-rack). 10.0 seconds
- Load pistol with 1 live round in chamber and 3 dummy rounds.
- On signal, take at least one side step to cover, verbalize, draw and fire 2 rounds. Attempt to fix the first malfunction using phase 1 (tap-rack), perform phase 2 (double feed/full reload) when phase 1 fails. 24.0 seconds.
These strings all involve a lot of non-shooting skills – movement to cover, verbalization, reloads, clearing malfunctions. The time limits are generous (could probably use 10 seconds for both of the first 2 strings) but the additional cognitive load on the shooter makes getting acceptable hits at the 7 yard line more difficult. This section of the test does a good job at incorporating all the skills a competent handgunner should be able to perform.
Those trying to run this part of the test in a single lane at an indoor range may find it difficult, as dummy rounds falling to the range floor may be difficult to recover, and shouting verbal commands at targets may have to be modified to simply mouthing the words or speaking them softly. However, don’t omit that step, as the time limits for the strings were designed to include time for those non-shooting tasks. Similarly, don’t cheat the double malfunction on the last string. Even though you will know that the tap-rack is going to fail, perform that technique before continuing on to the phase 2 clearance – both because the time limit was chosen to give time for both but also because starting with tap-rack as an immediate response to a malfunction is the correct mental programming.
The target should be scored and repaired again after all the 7 yard strings are completed, to identify problems and make it easier to assess performance for the 15 and 25 yard strings.
15 and 25 yards
The 15 yard string tests ability to shoot from both sides of cover, from standing and kneeling – skills that many people rarely practice. Practicing those skills in a single lane of an indoor range is basically impossible. Dry fire practice at home, using doorways and scaled targets, can be done to develop these skills. Older or less physically able shooters that have difficulty getting up and down from standing to kneeling should at least switch barricade sides for each pair (right side, left side, right side, left side). That does not mean changing what hand or eye you shoot your pistol with. Keep the gun in your normal two handed grip, and keep as much of your body behind cover as you can (without crowding it, as noted in the official instructions).
If you shoot poorly on this part of the test, the way to get better at it is to remove the barricade and alternate dry and live practice (at the range). 5 dry shots, 5 live shots. Or use the live & empty drill (one round chambered, no magazine in the gun, fire two shots, where the first shot goes bang and second one goes click). The live/empty (or live/dummy if you load your magazines to alternate live and dummy rounds) will expose all the unwanted movement of your hands pulling the gun off target as you press the trigger.
- From ready position behind cover (gun is drawn off the clock), fire 4 pairs of 2 rounds (standing left, standing right, kneeling right, kneeling left, in any order). 24 seconds.
- Perform an in-battery reload (aka ‘speed’ reload, or administrative reload) off the clock.
- Move to the 25 yard line or move targets back to 25 yards.
- Draw to preferred shooting position (off the clock).
- On signal, fire 4 rounds in 20 seconds.
- All of the hits at the 15 and 25 yard have to be in the D zone or better to pass.
Realistically, all the hits should be in the C zone or better. Under stress, ability to put all hits in the C zone becomes ability to put them all in the D zone. Ability to only keep them in the D zone means that under stress, some shots will fail to hit the intended target at all. That’s why the ability to keep all the hits in the B zone, in a slow fire test, is preferred. Under stress someone with that ability is likely to keep them all in the C zone, which will produce a much better outcome.
Those running this test as part of their own training should strive for A/B hits ONLY from 3 and 7, and C hits or better from the 15 and 25 yard lines.
SUMMARY
Shooting this course of fire requires special gear: a barricade, dummy rounds, a spare magazine in a mag pouch. Incorporating it into a typical range session is going to be more complicated than simply standing in one spot firing all shots from two handed standing. However: if you eliminate the repeated strings, it becomes a very compact 30 round course of fire that tests the full spectrum of handgun skills a competent handgunner should be able to perform: drawing, drawing while moving, moving to cover, shooting from cover, one handed shooting, reloading, clearing malfunctions, shooting from kneeling, and getting acceptable hits from 3-25 yards. The string times and target scoring areas are well chosen with each string of roughly equal difficulty level. I’ll be using this course of fire in some upcoming classes and in my Top 10 drills course at the 2024 Rangemaster Tactical Conference.
Pingback: KR Training February 2024 Newsletter - Notes from KR